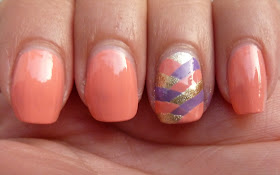
Braids are hot! Not even in your hair, but also on your nails. I learned myself how to make a braid pattern on my nails and so can you. The ones that still think it's hard to create a braid pattern on your nails, don't worry, I've got a tutorial for you! Oh, and it looks way more difficult than it actually is. :D
The many things you need:
- Base coat
- Three high pigmented different colored polishes
- Top coat
Step 1; Use your base coat and let it dry. Once your base coat is dry paint your nail with a color, we'll call this color number one. This color is 650 Goldfinger from Catrice. Now let this dry.
Step 2; Take your second nail polish color, place the brush at the left corner above, near the cuticle, and drag the brush diagonally down. Take it all down, don't quit halfway your nail, otherwise your braid will fail as the parts of the polishes come together in the middle of your nail. When this stroke is dry go to the next step. I used the polish Tart Deco from Essie.
A little tip. If you can see the color of the colored polish that is underneath, you have to repeat this stroke or simply redo the whole manicure with higher pigmented polishes.
Step 3; Take your third polish and place it at the right corner above, near the cuticle, and drag the brush diagonally down. Your overlapping the polish stroke. Again, don't stop dragging halfway, drag it all the way down. This last color is 130 Lucky In Lilac.
As you can see on the picture above I used a lighter shade of purple, which was not as pigmented as I hoped. The polish underneath shined through this light purple so I had to choose a more pigmented polish.
Step 4; Take your first colored polish again. Now, your going to repeat step two, but your going to start with this stroke just a few millimeters under the stroke that is above the one your now going to start with. Drag is just as diagonally as you did by the one that's above. Get it? Just make a stroke as shown on the picture.
Step 5; Repeat the stroke on the right side of your nail. To finish the braid you have to keep on repeating the strokes on each side, one by one, till there is no room left for another stroke. Finish it off with a layer of top coat and you're good to go!
You can paint all your nails like this, but personally I like to paint one or two accent nails like this. Oh, and the reason why I chose three complete different color polishes is because you can see the overlapping strokes so much better than when you picked three polishes in the same color range.
Hope you liked this tutorial and got a little more information on how to create a braid pattern on your nails! What do you think of braids in general? I'm a huge fan of them right now!


I love this. I will have to try it!
ReplyDeletewww.pynkkrush.blogspot.com
Wauwie! Super mooi gedaan!
ReplyDeleteLove it!
ReplyDelete