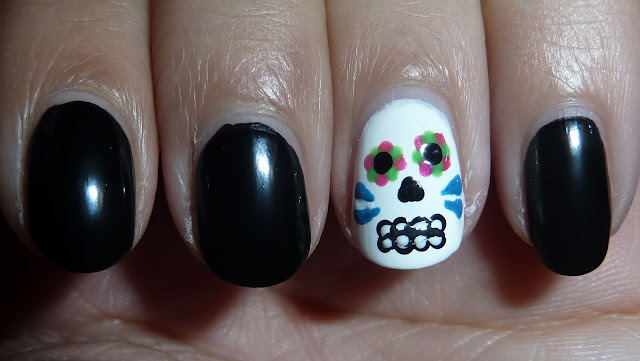
Happy Halloween everyone! Hope you are having a great day. Yesterday I promised you a sugar skull tutorial, voilá, here it is! Let's go!
Since the summer is over and we are heading towards the dark days, the sun goes down early. Where I live it's already dark around 7:30 PM. I made this tutorial a bit late in the evening so I had to use the flash on my camera. The pictures aren't the best quality because of that, hope you all understand.
Things you need:
- Basecoat
- White and black polish
- Other fun colored polishes to decorate the skull with
- Topcoat
- A dottingtool
- A tiny nail art brush or an eyeliner
- Makeup/Nail art palette or a piece of paper
- Cotton pads
- Nail polish remover
Step 1; Use your basecoat to prevent your nails from discoloration. Then take your white polish and paint the nail you want your sugar skull on. I painted my ringfinger white. I painted the other nails black.
Step 2; Take your black polish again, put some on a palette or just a piece or paper and dip your dottingtool in the polish. In the middle of your white nail you're going to make three dots in a triangle. This makes the nose. Then, make two dots above the nose like so on the picture above.
Step 3; Take one colored polish and make four dots around the eyes like so. The dots
are opposite of each other. Then take another color and now you're, again, going to make four dots around the eyes like so. Make the dots in between the other colored dots.
Step 4; Take your black polish and dots the eyes again.
Step 5; We're going to start with the teeth. Again, take your black polish and make four dots in a row,
in the
middle of the bottom half of your white nail. Then make one dot underneath each dot you made.
Step 6; Take your white polish and start dotting little white dots in each dots you made in step 5. Let the dots dry. Then take your black polish and a small nail art brush and start making the lines of the teeth we just created. Don't have a small nail art brush? Use an eyeliner!
Step 7; Take two colored polishes. Other than the colors you already used for around the eyes. Now you can create your own decoration with a nail art brush. I just made this random decoration which looks like nothing, haha.
Step 8; Contour the bottom half of the skull like so. This creates the jawline. This is the whole sugar skull look. Let this dry for about 20 minutes before you apply a topcoat. You don't want to smear the sugar skull you just made.
That's it for the sugar skull tutorial! Hope you enjoyed :D Have a fun and scary Halloween!


Oehh, erg leuk gedaan.
ReplyDeleteLiefs, xxx
So cool! I was wanting to facepaint like a calavera for Day of the Dead, but this looks much less full on :)
ReplyDeleteThank you for linking up to Followers to Friend's blog hop, I hope you met some cool new bloggy friends :)
Happy Halloween x
P.S. Shabby Apple are giving away a dress on my blog if you want to enter! http://www.sweetpeasylvie.com/2012/11/im-stylish-breastfeeding-mama-shabby.html
Heel leuk gedaan!
ReplyDeleteSuper leuk! xx
ReplyDeletenawhh so cute!
ReplyDeleteSo so cool! I need to try to do this! I love how you ca come up with all these wonderful looks for nails. Amazing! Anyway, followed you from the blog hop. Pls kindly follow back. Thank you :)
ReplyDeleteThank you!! Following back :D
DeleteOhh wauw! Dit ga ik écht proberen! WAUW!
ReplyDelete